- Name: Ying Yin
- Email: clevershadow@hotmailDELETEthisTEXT.com
- Company Name: UBC
- Country: Canada
Setting Up and Using CVS
You can access CVS repository in many ways. For Eclipse IDE (http://www.eclipse.org ):
):
For checking out project - Click File → new → project → CVS → Checkout Projects from CVS
- If you're running it the first time a setup window will pop up. Select Create a new repository location
- These are the information needed to fill in the Repository Location Information form:
- enter the host: cascade.cs.ubc.ca
- repository path: /ubc/cs/home/y/yingyin/GanttChart
- your CS Unix userid
- your CS password
- select connection type as "extssh" and use default port
- click Finish
- Choose "Use an existing module"
- Select a module (schedulingProblem). Don't select CVSROOT. Then click Next until Finish.
- Only need to check out a project once
- Note: the Java compiler compliance for the project is Java 6.0
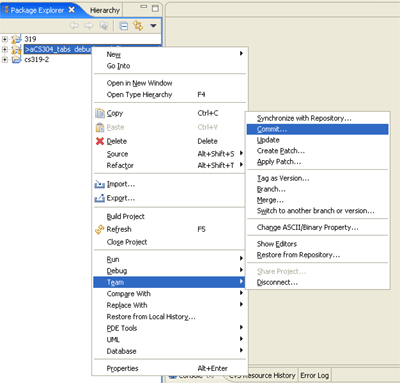
- Commit--once you have modified a project, you can check it back in
- Synchronise with repository--used for synchronising your project version with CVS
- The screen will look like the one in screen shot→(see attachment team.gif)
- Before making changes to the code, it is good to synchronise with the repository first.
- Create/Use existing project, and right click on the project name
- Select Team > Share Project
- Choose CVS as the repository type and then click Next
- Select "Create a new repository location"
- Fill in the repository location information as menstioned above
- Don't put project under CVSROOT directory
For Unix Commands:
Invoking CVS The format of a CVS invocation is: $ cvs <command> where command can be: update, commit, import etc. For example, you can use $ cvs update Accessing A Repository Before you can do anything, you must tell CVS the location of the repository you'll be accessing. This isn't a concern if you already have a working copy checked out - any working copy knows what repository it came from, so CVS can automatically deduce the repository for a given working copy. So for the first time, you need to tell CVS explicitly where to go. This is done with the -d global option followed by the path to the repository. For example: $ cvs -d /ubc/cs/home/y/yingyin/GanttChart <command> You can also change the environment variable CVSROOT to avoid typing -d <repository path>:- edit ~/csh_init/environment with a text editor
- add the following line: setenv CVSROOT <repository path>
- logout and log back in.
- http://www.cs.ubc.ca/ugrad/facilities/windows/cvs-setup.shtml
- http://cvsbook.red-bean.com/cvsbook.html
- Also see Eclipse help on CVS
- setfacl
- WelcomeGuest to learn TWiki
- Sandbox web to try out TWiki
- YingYinSandbox just for me
- Show tool-tip topic info on mouse-over of WikiWord links, on or off: (see details in TWikiPreferences)
- Set LINKTOOLTIPINFO = off
- Horizontal size of text edit box:
- Set EDITBOXWIDTH = 70
- Vertical size of text edit box:
- Set EDITBOXHEIGHT = 22
- Style of text edit box.
width: 99%for full window width (default),width: autoto disable.- Set EDITBOXSTYLE = width: 99%
- Optionally write protect your home page: (set it to your WikiName)
- Set ALLOWTOPICCHANGE =
- ChangePassword
- TWikiPreferences has site-level preferences of TWiki.
- WebPreferences has preferences of the TWiki.Main web.
- TWikiUsers has a list of other TWiki users.


Topic revision: r12 - 2007-06-17 - TWikiGuest

Ideas, requests, problems regarding TWiki? Send feedback