Section 2: Numeric Data
Representing numeric information in Python
The Python programming language provides many built-in data types. Our purpose is not to consider all of them but to provide an introduction to a commonly used subset.In CPSC 110 the languages that you learned are such that mathematical computations are exact whenever possible. This is one of the features of the programming languages used in CPSC 110 that allowed you to focus on design principles. Unfortunately, mathematical computations in many other programming languages are not exact, in general. The Python programming language has two commonly used data types that can represent real numbers in the world:
int and float.
The int data type is used to represent integer values while
the float data type can be used to represent integer and
non-integer values. One important difference between the two is that computations on data of type
int are always exact, whereas those on data of type float
are, in general, only an approximation to the exact value. We have stated that the
float data type can represent
integer and non-integer values. This raises a question. How do
we distinguish between an integer value represented by an int
versus one that is represented by a float? The answer
is to include a decimal point if and only if you want to represent the
integer value as a float. Python’s built-in type
function can be used to determine the type of a given value.
Consider the following: >>> type( 4 )
<type 'int'>
>>> type( 4.0 )
<type 'float'>
>>> type( 4. )
<type 'float'>
<type 'int'>
>>> type( 4.0 )
<type 'float'>
>>> type( 4. )
<type 'float'>
Another important observation is that binary arithmetic operations on data of type
int, produce a value of type int,
except in the case of division, where a value of type float
is produced. So, for example,>>> 15 / 5
3.0 # NOT 3
>>> 15 / 4
3.75
3.0 # NOT 3
>>> 15 / 4
3.75
There may be situations where you want to produce an integer result when dividing one integer by another. To do this in Python, use the floor division // operator. This operator divides one integer by another and rounds down to the nearest integer, as illustrated in the following examples:
>>> 6 // 3
2 # NOT 2.0
>>> 15 // 4
3 # 3.75 rounded down to 3
>>> -15 // 4
-4 # -3.75 rounded down to -4
2 # NOT 2.0
>>> 15 // 4
3 # 3.75 rounded down to 3
>>> -15 // 4
-4 # -3.75 rounded down to -4
When working with numeric information, you must now think carefully about how to represent that information as data in your program. Data of type
int should be used to represent integer values whenever
possible, as computations on data of type int are always
exact. Designing functions that consume numeric data
Before we learn how to design functions from scratch, we'll take a look at a function that has already been designed for us. The simple function illustrated in Interactive 1.1 consumes a value of typeint
and produces the square of that value (another int).
Explore this function by hovering your mouse over the different
components.This
is the signature. It indicates the type of data consumed
and the type of data produced. In this case, the function consumes
an
int and produces an int. This
is the purpose statement. It provides a concise
description of what the function produces.
This
is a test. It expresses the fact that when we call the
function with the argument 0, we expect the function to produce the
value 0.
This
is a test. It expresses the fact that when we call the
function with the argument 3, we expect the function to produce the
value 9.
This
is the body of the function. It contains the statements to
be executed when the function is called.
              def sqr( num ):
                  """


                  int -> int


                  Produces the square of num


                  >>> sqr( 0 )

                      0


                  >>> sqr( 3 )

                      9

                    """


return num * num Although you may not yet be familiar with Python syntax, you can probably identify the following elements of the How to Design Functions (HtDF) recipe: signature, purpose statement, tests and body. Investigate the interactive image to ensure that you can identify these elements.
Note that we use the
def keyword to define a function.
The return keyword is used to specify the value that is
ultimately produced when the function is called with the given
argument(s). Note that in addition to specifying the value produced
by the function, a return statement terminates the call to
the function.Finally note that we have a multi-line comment statement that starts with
""" and ends with """. This multi-line
comment statement includes documentation such as the signature, purpose
and tests. Given that the tests are designed as part of the
function's documentation, they are known as doctests or document
tests. Designing doctests
Each doctest starts with>>>
and is followed by a call to the function. Note that the space after
the three angle brackets is required. On the next line we specify
the value that we expect to see, if the call were made from a Python
shell. This is typically the value produced by the function.
We can include as many doctests as are needed. There are some pitfalls when using doctests. Note that we must specify the expected value as a literal value. We cannot use expressions to compute the value. So, in the second doctest provided in Interactive 1.1, you cannot write the following:
>>> sqr( 3 )
3 * 3 # this won't work
3 * 3 # this won't work
You must also be careful not to include any trailing spaces after the expected value, as everything you enter on the second line of the test must be produced by the function if the test is to pass!
Function Templates
Recall that the design of a function template is based on the type of data that the function consumes. Data of typeint and float
are examples of built-in, atomic data. The template for a function
operating on atomic data is: def fn_for_atmc( a ):
return ...a
return ...a
Recall that
... stands for do something with.
So this template conveys the fact that to determine the value produced by
the function we must do something with the value it
consumes. If the function consumes more than one atomic data, we
extend the function template in the natural way: def fn_for_atmc( a, b, c ):
return ...a ...b ...c
return ...a ...b ...c
How to Design Functions (HtDF) Recipe
The recipe for how to design functions is very similar to the one you encountered in CPSC 110 but the syntax is somewhat different. As you read through this section, focus on the fact that conceptually you are learning nothing new. Try to map everything you see here onto the design recipe that you saw in CPSC 110.- Use the
defkeyword to define the function header. This includes the function's name and parameter list.
- Write the function's documentation including:
- signature
- purpose statement
- Write a stub that produces a default value whose type matches the
type of data that the function produces, as specified in the function
signature.
- Design tests and add them to the function's documentation in the
form of doctests.
- Run your program and remove any syntax errors. Note that at
least one test is expected to fail, in general, as we have only a stub
in place at this point.
- Replace the stub with the template for a function that consumes data
of the type specified by the function signature.
- Complete the template.
- Run the tests and debug your program until all tests pass.
int in our
program. Our program will produce data of type int
that represents the corresponding area of the rectangle. The
following diagram illustrates how information in the world is represented
as data in our program and how data in our program is interpreted as
information in the world for the particular case where we wish to compute
the area of a rectangle of width 20cm and height 10cm.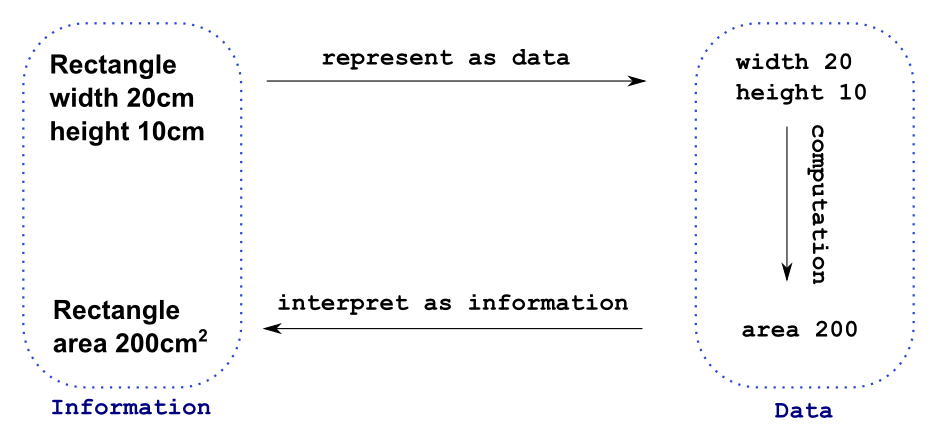
Now we can focus on the design of the function. This function performs a computation that takes us from the two integer values that represent the width and height of the rectangle to another integer value that we will interpret as the area of the rectangle.
Here's the final product:
def rect_area( width, height ):
"""
int, int -> int
Produces the area of a rectangle of
the given width and height
>>> rect_area( 0, 0 )
0
>>> rect_area( 10, 20 )
200
"""
return width * height
"""
int, int -> int
Produces the area of a rectangle of
the given width and height
>>> rect_area( 0, 0 )
0
>>> rect_area( 10, 20 )
200
"""
return width * height
Take some time to study the design of the function above. It's a fairly straightforward example but it's important that you familiarize yourself with Python's syntax.
Now let's modify the problem specification and make the reasonable supposition that the width and height of the rectangle are not necessarily integer values. In this case, we choose to represent the width and height using data of type
float. The function will
then produce a float that we interpret as the area of the
rectangle. This version of the function is presented below.
Compare it with the earlier version and note that the body of the function
is identical! def rect_area( width, height ):
"""
float, float -> float
Produces the area of a rectangle of
the given width and height
>>> rect_area( 0.0, 0.0 )
0.0
>>> rect_area( 10.0, 20.0 )
200.0
"""
return width * height
"""
float, float -> float
Produces the area of a rectangle of
the given width and height
>>> rect_area( 0.0, 0.0 )
0.0
>>> rect_area( 10.0, 20.0 )
200.0
"""
return width * height
Notice that we've been careful to use data of type
float
rather than data of type int for the values consumed and the
values produced when designing our tests. It is important to realize
that 0.0 is not the same as 0. If we specify that 0 is the expected
value when the function actually produces 0.0, the test will fail.We now have two versions of our
rect_area function that are
very similar. In fact, the only points of variation are the
type of data that the function consumes and the type that it
produces. We will now introduce the Real data
type. It is a more abstract, numeric data type that encompasses the
types int and float. By this we mean
that values of type int and values of type float
are both considered to be values of type Real. We will
use the Real data type whenever we have values that could be
of type int or of type float. The
following function, that uses this more abstract data type, therefore
takes the place of the two earlier versions: def rect_area( width, height ):
"""
Real, Real -> Real
Produces the area of a rectangle of
the given width and height
>>> rect_area( 0, 0 )
0
>>> rect_area( 10, 20 )
200
>>> rect_area( 10.5, 2.0 )
21.0
"""
return width * height
"""
Real, Real -> Real
Produces the area of a rectangle of
the given width and height
>>> rect_area( 0, 0 )
0
>>> rect_area( 10, 20 )
200
>>> rect_area( 10.5, 2.0 )
21.0
"""
return width * height
Given that the
Real data type encompasses ints
and floats, notice that we have at least one test that calls
the function with arguments of type int and at least one
other that employs arguments of type float. Designing tests with values of type float
We have already commented on the fact that computations on data of type
float are not exact, in general. For this reason, we have
to be careful when designing tests where the expected value is a float.
In such cases we cannot expect the function to necessarily produce the
exact value. In the tests that we designed for our rect_area
function above, we got lucky - the function happened to produced the exact
value when given the arguments 10.5 and 2.0.
However, it's not hard to construct an example where the value produced by
the function is not exact. For example, the following test will
fail: >>> rect_area( 0.1, 0.1 )
0.01
0.01
The value produced by the function is actually 0.010000000000000002 - a very good approximation to 0.01, of course, but not the exact value.
When designing tests for functions that produce data of type
float,
we require the value produced to be only close enough to the
expected value. So, in the example above, rather than stating that
the expected value is 0.01, we have to design our test in such a way that
the test will pass whenever the actual value produced is close enough
to the expected value. We achieve this by requiring that the
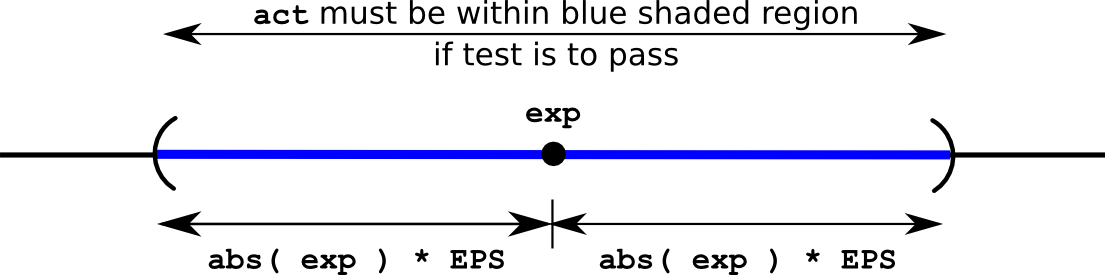
distance between the actual and expected values is small. Our test therefore becomes:
>>> act = rect_area( 0.1, 0.1 )
>>> exp = 0.01
>>> abs( act - exp ) < abs( exp ) * EPS
True
>>> exp = 0.01
>>> abs( act - exp ) < abs( exp ) * EPS
True
where
EPS is a constant whose value is something small, like
1.0e-6. Note that the actual value produced is assigned to the
variable act and the expected value is assigned to the
variable exp. This test will pass only when the distance
between the actual and expected values is within 1.0e-6 of
the size of the expected value. The set of values for which the test passes are represented by the blue shaded region in the following diagram:
The final version of our
rect_area
function is presented in Code
Explorer 1.1