2. Choose Options > Toolbar.
A toolbar should appear with brushes, circles and squares.
3. Choose Options > Palette.
The Tools window should appear with a colour palette.
4. Fun things you can try:
- Freehand Drawing
- Like all artists, you need a brush to paint. If you click and hold
your left mouse button down on the Brush button (
 at top right in the toolbar), an array of brush options will appear:
continuous freehand, dotted freehand, and single freehand. You might
want to click on continuous freehand to start with.
at top right in the toolbar), an array of brush options will appear:
continuous freehand, dotted freehand, and single freehand. You might
want to click on continuous freehand to start with.
- Now you need a colour, so take your brush (i.e., your mouse) and click,
with the left mouse button, on the colour you would like to use.
If you want to have another colour handy while you draw, click on a
second colour with the right mouse button.
- To draw, hold down a mouse button and drag the "brush" across the
canvas (the white space).
- Like all artists, you need a brush to paint. If you click and hold
your left mouse button down on the Brush button (
- Shape Drawing
- Ultimate Paint is capable of drawing many kinds of shapes or lines.
You may start by clicking on a circle, a square, a line or an arc in
the toolbar.
- Experiment with different colours and shapes.
- Ultimate Paint is capable of drawing many kinds of shapes or lines.
You may start by clicking on a circle, a square, a line or an arc in
the toolbar.
- Saving an Image
- When you save your image, make sure it's saved as a ".gif" file.
If you only want to save the image you have created, and not the background, make sure that the Transparent box is checked in the Save File window. If the Transparent box is not checked, then the background, along with its color, is part of the image, and that will be undesirable later if you want to place the image on a different background. (If the option to make the picture transparent doesn't work, please ignore this issue.)
- When you save your image, make sure it's saved as a ".gif" file.
- Advanced Brush Options
The following steps may be depend on which version of Ultimate Paint you are using. If you do not see Options > Brush Shape, you will not see extra brush shape details in the Tools window (Step 2). It may take a few tries to get used to creating advanced brush shapes, so remember to Undo anything you don't like.
- To change the basic shape of your brush, click and hold the left mouse button down on the Brush Shape
button (top left on the toolbar, next to the Brush button). From the buttons that appear,
choose a brush shape (circular or square) and a different brush size, by clicking on the appropriate button.
- To see what the current brush shape is, choose Options > Brush
Shape, and the brush shape should show up in the Tools window
(under a tab called Brush). Here you can change some basic brush
features. (You can't do this in version 2.80.)
- There are also many advanced options for the brush in the Brush
menu and you can apply multiple changes to your brush. Below is an example:
 large circular brush that has been stretched
width-wise and bent up-and-down.
large circular brush that has been stretched
width-wise and bent up-and-down.
- To undo a change to the brush shape, select Brush > Undo some change. To change the brush back to its original shape, keep selecting Brush > Undo until there's nothing left to undo.
- To change the basic shape of your brush, click and hold the left mouse button down on the Brush Shape
button (top left on the toolbar, next to the Brush button). From the buttons that appear,
choose a brush shape (circular or square) and a different brush size, by clicking on the appropriate button.
- Special Effects
- There are a LOT of fun things you can do to your image under the Image
menu. For example, try selecting:
- Image > Noise > Noise Blur (this is what your picture would look like in a sandstorm) or
- Image > Transform > BlowOut (what your picture would look like with some electricity running through it
A new tab will appear in the Tools window with a preview of what the image will look like after the special effect (also called a "filter") is applied. Play with the options and click the Apply button to make the special effects show up.
There are lots of effects to try. Take some time to try them out. You can also use the selection tool (the button on
the toolbar) to select a portion of the image and try different effects
on different parts of your image.
button on
the toolbar) to select a portion of the image and try different effects
on different parts of your image.
- You can also create custom special effects. Choose Image
> Custom Filter and play around with any of the numbers, including
the Div and Bias numbers. Try out some larger numbers like 20 or 50.
The preview button shows you what the effect will look like if you click
OK.
- There are a LOT of fun things you can do to your image under the Image
menu. For example, try selecting:
- Resizing
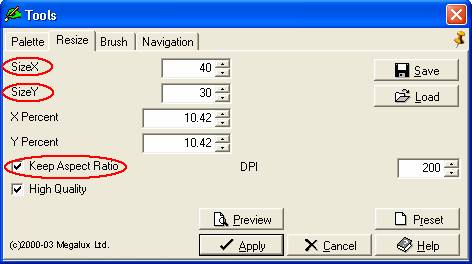
- You may want to set the exact size of your image. To do this, choose
Image > Resize to show the Resize tab in the Tools
window. Here, you can set the exact width (SizeX) and height (SizeY)
of your image. If these numbers seem high, it's because they represent
the number of pixels wide and high that your image is. If you want the
entire image to be resized equally, instead of stretched in one direction,
make sure that Keep Aspect Ratio is check-marked in the Resize
tab.
- Cropping
- When you crop an image, you're keeping only the part of the image
that you currently have selected. To crop an image, first select part
of the image using the select tool ( in the toolbar)
to click and drag on the image. Then, choose Image > Crop,
and a new window should appear with only the piece you've selected.
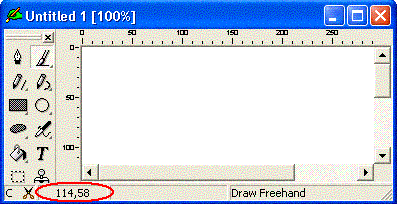
- To get a better idea of the location of your mouse cursor when you're
selecting a piece of the image, you can look at the pixel coordinate
position. Choose Options > Preferences, then click on
the Interface tab, and finally make sure that the Measurement
Unit drop-down box is set to Pixel (you may get a popup window that says "Directory does not exist", but click OK there). The (X, Y) coordinates
of your mouse cursor are now displayed in the bottom left-hand corner
of your window, as shown in the following picture:
- Now you can precisely select part of your image. If you want to select
the top left quarter of an image that is 640 x 480 pixels, then click
the mouse at (X=0, Y=0) and drag it to (X=319, Y=239). (Remember that
because we started counting at 0, we end at 1 less than 320 and 240).
Then choose Image > Crop and you'll have a new image that
contains just the top left quarter of your original image. You can save
this new image as a separate image just like you saved the original
image.
- When you crop an image, you're keeping only the part of the image
that you currently have selected. To crop an image, first select part
of the image using the select tool (
- Importing an Image
- Remember in the Getting Started lab when you downloaded an image off
the Web? Go to File > Open to find that image (or any
other image you may wish to use).
- You may use the same techniques described above to modify this image.
- Remember in the Getting Started lab when you downloaded an image off
the Web? Go to File > Open to find that image (or any
other image you may wish to use).
- Other Fun Tools
- If you want to learn more about what the other tools do, simply hold
(don't click) the mouse pointer over a button on the toolbar. A small
yellow tag should appear with a description of the tool.
- If you want to learn more about what the other tools do, simply hold
(don't click) the mouse pointer over a button on the toolbar. A small
yellow tag should appear with a description of the tool.
Part II: Creating and Splitting an Image
1. Create an Image: Use Ultimate Paint to create a new image and set the size to 640 x 480 (SizeX=640, SizeY=480). To prepare your image, you are required to use the various shapes, colours, textures and effects that were introduced in Part I. Make sure as well that you use at least two different types of custom brushes that have been modified a few times (e.g., make the size bigger, stretch and bend the brush), and a custom filter.
Some possible images you could create that would make use of the many features of Ultimate Paint include drawing:
- a basket or a bowl of fruit
- a beach scene or landscape scene
- the view from a window / a cityscape scene
You are not limited to these suggestions. If you have an idea other than the above, create it! Just make sure to incorporate various shapes, colours, textures, etc. of Ultimate Paint. Try to come up with something that you could add to your web page.
You can also copy and paste together images from the web to create an image or add to your creation.
Save your image in a new folder. When you save your image, there are two things that you need to check in the Save File window:
- That the "gif" file format is selected. (You can also use "jpeg" for images to be included in web pages.)
- That the Transparent box is checked (it's in the lower half of the window) if you don't want to save the background as part of your image.
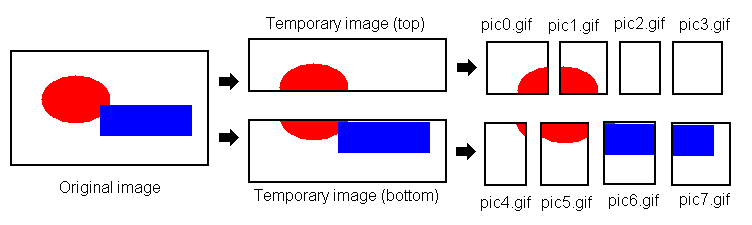
2. Split it up: (Make sure you save enough time for this step.) Next, you need to split your image up into 8 smaller images using the crop tool, like this:
Before you begin, make sure you are viewing the image at 100% zoom. The zoom
can be adjusted using the zoom buttons on the top toolbar ( ).
Click the up or down arrows until you reach "1".
).
Click the up or down arrows until you reach "1".
The idea is to crop the image first into two rows, then to crop each row into four columns. This will create 8 separate images that you should save as pic0.gif, pic1.gif, etc. The heights of the rows do not have to be exactly equal, nor do the widths of the columns. To do this:
- Select the top part of the image and crop it. From the new temporary image, select a rectangular piece starting at the left. Crop this, save it as pic0.gif, and close it. Continue for pic1.gif to pic3.gif. Once you have split the top part of the image into four pieces, close the temporary image you were working with.
- You should be left with the original image again. Now select and crop the bottom part of this image and divide that part into 4 pieces (pic4.gif to pic7.gif).
- Tip: The idea is that you should be able to take the smaller pieces and reassemble them to form the original image. To make sure that your small images won't overlap, use the (X, Y) pixel coordinates to figure out where the edge of each selection is before you crop it. For example, if you crop the top part of the image from (0,0) to (639, 220), then make sure when you return to crop the bottom half of the image, that you start at (0, 221) (i.e., the very next pixel row) and go to (639, 479).
Deliverables
Show the original image you created to your TA, along with the 8 smaller images. If you like, add the original image to your web page.
Grading scheme for this lab:
- 1 mark for use of different colours
- 1 mark for variety of shapes and fills used
- 2 marks for using at least one 'special effect' (a custom filter)
- 1 mark for some freehand drawing
- 2 marks for multiple brush sizes used
- 2 marks for splitting the image into 8 smaller images and saving those correctly
- 1 mark for creativity