(Updated:
2005/09/14 02:44
)
Getting Started
Created by: Shelly Zhao
Updated
by: Tanya Ellchuk
Updated
by: Holger Hoos
Comments to: Holger Hoos
Sources: Some of the lab materials were taken from the
CPSC 100-101
lab manual.
Contents
Objectives
The purpose of this lab session is to acquaint you with
basic things you should know to do when using a computer to create documents or explore
the web. In
this lab, you will learn how to interact with different elements of the
Graphical User Interface (GUI). These include icons, windows, menus, files,
folders, documents, and applications. The main activity of the lab will be to
create a simple document about you and your interests.
The following topics are covered in this lab:
Before the Lab
Read through all of the lab instructions prior to your lab session. Fully understand
the Lab Etiquette. Chapters 2 and 3 of the
textbook provide useful background.
Lab Etiquette
Things you should do:
- You may place diskettes into the disk drive slot and place CDs on the CD
tray.
- Feel free to ask the TAs any relevant questions.
- Log out and let someone else use your computer if you must leave for longer than 15
minutes.
- Protect your diskettes from moisture, dust and dirt, magnets and
extreme temperatures.
- Feel free to interact with your fellow students, in turn, be helpful if
those around you need your help. However, in the end, you
must do your own thinking and your own work.
You will not hurt or damage the equipment through normal use.
Things
you shouldn't do:
- Smoking, food and beverages are not permitted in the lab.
- Don't use the CD tray as a beverage holder or bookshelf.
- Keep the volume down and don't play CDs unless you are using personal
headphones.
- Don't stick things in holes. In the unlikely event that a CD or a diskette
becomes stuck in the machine, ask the lab Teaching Assistant (TA) or a lab
technician for help in removing it.
- Don't touch the screen with pens, pencils, fingers or other objects.
- Do not power off machines manually. (i.e. do not use the power switch at
the back of the machine). Logout from your current session and click the Shutdown
button.
- Do not play games in the lab.
- Do not play, display or print any material that could be objectionable to fellow
users. You are responsible for the sounds played, the pictures displayed and
the pages printed on your computer or from your account.
- Do not give your password to anyone. You are responsible for your account
and its use.
- Penalties will be administered for failure to comply with the lab courtesies.
(You will be given the complete CS Undergrad Lab Policies handout in class.
Be sure to read it carefully). Penalties for such academic misconduct could
lead you to lose access to the lab and cause you to fail the course.
Getting Comfortable
 You needn't be involved in heavy lifting
to develop back, neck, shoulder or leg problems. Try working at a computer day
after day. Sitting too long in incorrect positions is one of the chief causes of
aches and pains in your muscles and joints from computer work. And small strains
that are hardly noticeable accumulate and can become unbearable.
You needn't be involved in heavy lifting
to develop back, neck, shoulder or leg problems. Try working at a computer day
after day. Sitting too long in incorrect positions is one of the chief causes of
aches and pains in your muscles and joints from computer work. And small strains
that are hardly noticeable accumulate and can become unbearable.
Take note of the illustration and the following suggestions for maintaining
proper posture when using a computer. Some of these may not feel as comfortable
as your current posture. But after a while your muscles will be trained to the
new position, and you'll feel comfortable again. Also, check with a computer or
office store for specific ergonomic devices that may help you.
 Sit directly in front of the keyboard and
computer screen.
Sit directly in front of the keyboard and
computer screen.
 Situate the monitor so it will be 18"
to 24" from your eyes and you have to look slightly down to see it.
Situate the monitor so it will be 18"
to 24" from your eyes and you have to look slightly down to see it.
 Make sure your legs fit beneath the desk
with your feet flat on the floor. Use a foot rest if necessary.
Make sure your legs fit beneath the desk
with your feet flat on the floor. Use a foot rest if necessary.
 Adjust the chair seat height so your thighs
are parallel to the floor with your knees at about 90° and slightly lower than
your hips. Make sure your chair seat isn't too deep.
Adjust the chair seat height so your thighs
are parallel to the floor with your knees at about 90° and slightly lower than
your hips. Make sure your chair seat isn't too deep.
 Use a work surface that allows your elbows
to maintain about a 90° angle.
Use a work surface that allows your elbows
to maintain about a 90° angle.
 Sit upright, maintaining the natural curves
of your back.
Sit upright, maintaining the natural curves
of your back.
 Make sure you have adequate lower back
support.
Make sure you have adequate lower back
support.
 Keep your shoulders relaxed. Don't slump
forward.
Keep your shoulders relaxed. Don't slump
forward.
 Relax your wrists and keep them in a
neutral position. Don't flex them up or down.
Relax your wrists and keep them in a
neutral position. Don't flex them up or down.
 Keep your knees shoulder width apart or
closer.
Keep your knees shoulder width apart or
closer.
Web pages on this topic are at the end of the lab.
During the Lab
Remember, get comfortable!
Start the Computer
Before you can begin to use the computer, you may need to turn it on. In
addition, because you are working in a multi-user environment, you must also
login.
You must provide your username and password in the Login dialog box. Your
username will be your user-id for your computer science account. If it is
your first time logging on, you will need to create an account.
Create an Account
Because you don't yet have a login id, at the log in prompt, type getacct.
Follow the instructions on screen. You will be prompted to enter your
student number and last name and will then be asked to create a password. The password should be no more than 8 characters long.
Once this process is complete, you can log out, and use the login id and
password you have just created to log into the Windows environment.
Logout of your account
Click  on the left-bottom of the window, and choose ShutDown...
  ,
and choose Log off from the pop window,
,
and choose Log off from the pop window,  then click OK.
Note: Do not click any other option except log off.
Use Notepad to Create a Text
File
A file is a collection of bytes stored as an individual
entity. All data on disk is stored as a file with an assigned file name that is
unique within the folder (directory) it resides in.
A text file is a file that contains only text characters. Now we will create
a simple text file using Notepad.
Open the Notepad:
click
,  ,
,  ,
, 
Type the following information into the document; a space is needed
between each word.
- introduction - name, e-mail, student number,
hobbies, interests, intended major....
After finishing all the input,
click File from the menu bar, choose Save or Save
as,

choose disk/drive Z in the Save in window, and click
on the Create New Folder Icon  , type lab0 and press enter.
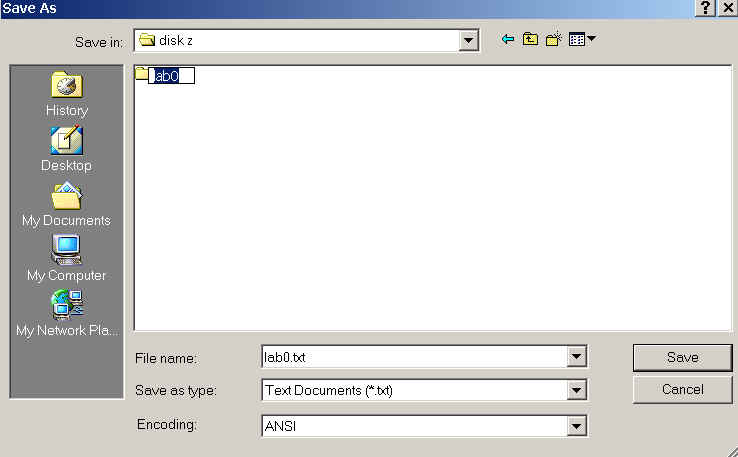
There should be a folder called "lab0" now. Double click on this folder to open it and type lab0.txt as your File name. Then
click Save.
Close the file by choosing
File -> Exit, if it asks "Do you want to save the change?" Click
Yes.
Find the "My Computer"
icon on the desktop. Double click on My
Computer, find Disk Z, make sure
there is a folder "lab0" and has a file lab0.txt in it. If
not, you need to create the file again.
Create
Directories (Folders)
In a graphical user interface (GUI), a folder holds data,
applications and other folders. Folders were introduced on the Xerox Star, then
popularized on the Macintosh and later adapted to Windows and UNIX. In Unix,
DOS and Windows 3.1 (an old Windows), a folder is known as a directory, and a subfolder (folder within a folder) is a subdirectory.
Windows Folders:
Folders on the hard disk are pictured as manila file folders, but they are not
fixed in size and can hold as much data as there is room on the entire disk.
You can use My Computer in future
labs when you will need to create folders (directories). As described
above, double click the My Computer icon, double click Disk
Z. All file and folders that belong to your home directory will be
displayed. To select a directory to see it's contents, double click on
it. To create a new directory, click on the File menu,
select New, then select Folder and give your new
folder a name. To rename an existing folder, select it (by clicking on it
once). Once selected, you can do one of the following:
and enter the new name for your
folder. You can also use Windows Explorer to view, rename,
or delete your files, as well as create new ones. To open Windows
Explorer click Start -- Programs --
Accessories -- Windows Explorer.
Open a new file/an existing
file:
Open a new file:
- Choose File from the menu bar, and choose New
or
click New
 after you open the application.
Open an existing file:
Launch the application you want to use.
- Choose File from the menu bar, and choose Open
or
click Open
 after you open the application
- If you want to open a document that was saved in a different folder, locate
and open the folder.
- Double-click the document you want to open.
Tip: To open a document you've used recently, click History on the
Places Bar in the Open dialog box. In Word, you can click the file name at the
bottom of the File menu. If the list of recently used documents isn't displayed,
click the General tab (Tools menu, Options command). Select the Recently used
file list check box.
Now, open the file lab0.txt you just created, and
add
more content by answering each of the questions listed below. Each
question will need to be started with a separate
paragraph. Press the "Enter" key at the end of each
paragraph. Don't worry about the format of the file; we will take care of it in
later labs. Remember to save the file after finishing each paragraph. See
the next section for how to save a document as you work.
Answer the following to add content to your lab0.txt file:
-
How do you expect
to use computers?
(different expectation starts with separated lines)
-
What do you do most with computers?
-
What things do you most
want to learn about from this course?
-
What computer skills are
you most interested in learning about?
Save files
- Save a new document: See Using Notepad to
Create a Text File.
- Save a document as you work: When you are working
on a document, it is a good habit to save your work often. Just go to
"File" from the menu bar, and choose "Save" from the
pop-down. Alternative options would be the toolbar
 or Ctrl-S from the keyboard shortcut.
- Changing a document's name: Go to "File"
from the menu bar, choose "Save As". Type the changed name in the "File Name"
box, and Click Save. This saves a new copy of the document with
the new name. The previous version of the file also still exists
with old name; it is not overwritten when you choose "Save As"
and give it a new name.
- Save files to different directories: Go to File
from the menu bar, choose Save As, choose
the destination folder from the Save in, and type the
name you want to change to in the File Name, and Click Save.
- Save files, pictures from Web:
- In Mozilla, Netscape or Internet Explorer, open a new web browser window by choosing File -> New -> Window

- In the location field, type
http://www.cs.ubc.ca/ugrad,
point your mouse to the top picture of the page, right click mouse and choose
"Save picture as" from the pop-up menu. Save the
picture into your Z:/lab0/ directory with the name title.jpg. Or you
can just save the picture from this page by doing the same operation
here.

Locate a folder
When you open, save, or insert a file, you can locate a
folder in the following ways.
| To |
Do this |
| Go to any location
available from your computer |
Click a drive, folder, or
Internet location in the Look in box (Open or Insert
dialog box) or Save in drop-down list box (Save As dialog
box). |
| Create a new folder |
Click Create New
Folder . |
| Open a folder in the
folder list |
Double-click the folder. |
Close Files / Applications
To close a file, choose File on your
application's menu bar, and choose close in the pop-up menu. Ctrl-F4
has the same function in most of the applications.
To close an application, choose File on
your application's menu bar, and choose Exit in the pop-up
menu.
In some applications, there may not be a close, you can always choose
Exit after you save to
close it.
You can also click the  icon on the top right of your window to close an application or a window.
File Types:
Here is a sample of some of the different file types
you may encounter or need to
use.
| File Type |
suffix |
Application |
examples |
| Text files |
.txt |
Notepad, Wordpad |
myfile.txt |
| Word Document |
.doc |
MS Word |
myfile.doc |
| Spread Sheet |
.xls |
MS excel |
myfile.xls |
| Presentation |
.ppt |
MS PowerPoint |
myfile.ppt |
| webpage |
.html, .htm |
Internet Explorer, Netscape |
myfile.html |
| images |
.jpg, .gif, .bmp |
MS Paint, Imaging, Ultimate Paint |
myfile.jpg, myfile.gif, myfile.bmp |
| audio |
.wav |
|
myfile.wav |
| video |
.avi, |
|
myfile.avi |
| executable |
.exe |
|
myfile.exe |
Internet Basics
Several web browsers are available on this system, including Mozilla, Netscape, or Internet Explorer (IE). The following steps are written for Mozilla, but you are welcome to use other browsers if you prefer.
-
Bookmarking Your Favorite Sites:
If you want to save the location of a favorite page or if you want to visit
certain pages often, you'll want to create bookmarks for those pages. Bookmarks
are saved on the Bookmark list until you decide to delete them.
Bookmarks and bookmark folders are arranged like folders and files on your
hard drive. The easiest way to access bookmarks is by using the Bookmarks menu.
 On
Windows systems, hold down the Bookmarks button on the Location toolbar to view
the list of bookmarks. You can then select any bookmark from the list to visit
that web page.
On
Windows systems, hold down the Bookmarks button on the Location toolbar to view
the list of bookmarks. You can then select any bookmark from the list to visit
that web page.
Now go to the page http://www.cs.ubc.ca/ugrad
. Hold down the Bookmarks button  on the location
toolbar and select "Add Bookmark", "Bookmark This Page" (or similar phrase) to add a bookmark for the current page to the
bottom of the Bookmarks menu. Or press Ctrl+D to add a bookmark instantly.
Open the Bookmarks menu and you'll see your bookmark filed at the bottom of the
list.
on the location
toolbar and select "Add Bookmark", "Bookmark This Page" (or similar phrase) to add a bookmark for the current page to the
bottom of the Bookmarks menu. Or press Ctrl+D to add a bookmark instantly.
Open the Bookmarks menu and you'll see your bookmark filed at the bottom of the
list.
- E-mail:
You can learn how to set up Thunderbird to read e-mail by clicking
here. Suggestion: before sending e-mail, go to
Edit, then to Mail and Newsgroups Account Settings, then to
Copies and Folders, and deselect the option to save to sent folder (this
will help avoid useless pop-up boxes).
If you are familiar with Outlook Express, you can use that instead.
- Creating and Sending an E-mail to your TA
-
On the toolbar for e-mail click the New Msg or Compose button .
The Compose, or Send Mail window will appear and will look roughly
like the image to the right:
- Type the address of your TA and press Enter (Return).
- Press Tab to move to the Subject text box.
- In the Subject text box type the subject of the message.
- Press Tab to move to the Body text box.
- In the Body text box type the text of the message. This should include your name, student number, your computer science ugrad account number, and your lab section.
- When you're all set, click the Send button to send the message.
Unix Introduction
We won't learn Unix in this course, however, we may need to use some of
its features through our labs. If you are out of time to do this in the first lab, don't
worry - you know where to find the information when you need it. Here is what you need to do.
Launching
SecureCRT (found by clicking on Start) will enable you to work in
the Unix environment while still in Windows. Your lab TA
will help you set up the connection for the first time.
When
you first open SecureCRT you will most likely see the following:
If
you see
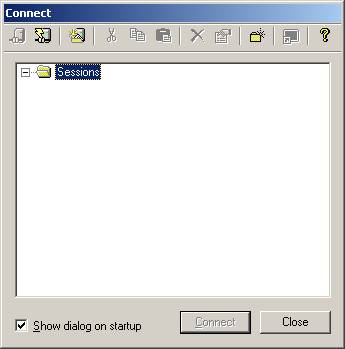
instead,
pressing the right mouse button on the word Sessions and selecting Quick
Connect from the shortcut menu that pops up should give you the following
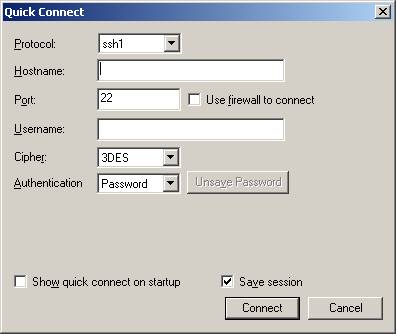
Changing
the protocol to ssh2 will change the window to reflect the first Quick Connect
window shown.
Alternatively, you can select Quick
Connect from the File menu to get the windows described above.
Once
you have a Quick Connect window open, change the Protocol to ssh2;
the content of the window should change. Complete the fields to reflect
this sample below:
Press
OK when you are finished. Make sure that you save this session; otherwise
you will have to go through this process each time you open SecureCRT.
You
will need to provide your userId and password again to login to the server.
They are the same ones you use to login to the PC.
Unix Commands:
Viewing Files and Directories
Type the following at the xterm window:
ls -l
then the following information might be displayed:
-rw-r--r--
4 a1a1 guest 9512 May 10 15:21 banner.gif
drwx------
1 a1a1 guest 512 May 13 09:59 document
-rwx------
1 a1a1 guest 5275326 May 27 15:53 emacs
-rw-------
5 a1a1 guest 11512 May 28
15:28 hello.cpp
-rw-r--r--
4 a1a1 guest 512 May 19 15:27 homepage.html
drwx------
1 a1a1 guest 25194 Jun 16 09:59 temp
The meaning of the information contained in each column is (column 1 is the
leftmost column):
Column 1: The type of the named entry: the first character in this series of
dashes and letters is either "d" indicating a directory or
"-" indicating a file, followed by the access permissions "-rw-r--r--".
These access permissions specify which users have permission to read, write, or
execute the file, which are designated as "r", "w", and
"x" respectively.
Making and Removing Directories
The Command "mkdir"
As you start a new project, you might need to create a new directory for
storing files. To make a new directory, use the make directory command, mkdir.
The directory will be created as a subdirectory of the current working
directory. If you want to create the directory "cs100"
inside your home directory, then while you are in your home directory, you
should type:
mkdir cs100
Unix makes a new directory named "cs100", located in your home
directory.
The Command "rmdir"
To remove a directory, you use the remove directory command, rmdir.
The command name is followed by the name of the target directory. For example,
rmdir ~/cs100
will remove the "cs100" directory located in the home directory. If
the target directory contains files or subdirectories, rmdir will display
the error message:
Directory not empty
Sometimes rmdir will report a more cryptic error, such as:
rmdir: cs100:
File exists
You must delete all the files and subdirectories in the target directory
before removing the directory.
Copying, Moving and Removing Files
Unix allows you to copy, move, rename, and remove files. You can make a copy
of a document before experimenting with format changes. You can move files into
or out of a directory, and rename files to better organize them. When a file is
no longer needed, you can remove it.
Copying Files
To duplicate a file, use the copy command, cp. The format of the
command is:
cp source_filename destination_filename
where source_filename is the name of
the original file and destination_filename is the name of the resulting
copy.
Moving (or Renaming) Files
To move a file to a different location, use the move command, mv. The
format of the command is:
mv source_filename destination_filename
where source_filename is the name of
the original file and destination_filename
is the name of the file to move to.
Removing Files
To remove a file, use the remove command rm. This command has
the following form:
rm filename [filename]
where each filename is the name of a
file you want to remove.
Note: rm is very powerful and permanent; use it with extreme caution.
There is no way to recover a removed file in a Unix system.
Commands Summary
The following table summarizes the commands for managing files that have been
discussed:
| Command |
Function |
| ls |
To list the contents of the current directory. |
| ls -F |
To list the contents of the current directory in terms of files,
directories and executable programs. |
| ls -a |
To list the contents of the current directory, including hidden files. |
| ls -l |
To list the contents of the current directory in details. |
| pwd |
To list the pathname of the current directory. |
| cd |
To navigate to another directory. |
| mkdir |
To make a directory. |
| rmdir |
To remove an empty directory. |
| cp |
To copy files. |
| mv |
To move(rename) files. |
| rm |
To remove files. |
| rm -i |
To remove files with confirmation. |
| rm -r |
To remove a directory. The contents of the directory is also
removed. |
| rm -f |
To remove files, overidding any confirmation. |
Deliverables
- Send an e-mail to your TA.
- Keep your lab0.txt file under your lab0 folder/directory.
- Your TA may ask you to demonstrate some of the things you've learned in
this lab. Be prepared to do so.
Resources and Reference Links
- CPSC 101 / WMST 201 Course Web Page
- Computer
Science Undergraduate Student Web Page:
has information about the CS undergraduate program and facilities
For problems with your
undergraduate account, e-mail help@ugrad.cs.ubc.ca
or ask your TA.
- You will be provided 30 units of printing quota for the first lab. You can
purchase more printing coupons from the bookstore or Copyright.
- For more information on undergraduate accounts,
printing, and lab availability, check www.ugrad.cs.ubc.ca
or ask your TA for details.
- Computer Ergonomics:
Ergonomics is the study of the relationship between people and their
work with the goal of designing job tasks, work stations, tools and equipment
to fit the physical capabilities of people. Creating a good ergonomic working
arrangement is important to protecting your health. Following is a
useful link for information on computer ergonomics:
Cornell University Ergonomics Web:
http://ergo.human.cornell.edu/ergoguide.html