Introduction to Eclipse
Objectives
This Tutorial will introduce you to Eclipse, a full-featured and very versatile Integrated Development Environment. During the assignments and labs in this course you will be using Eclipse extensively to develop Java programs.
By the end of this Tutorial you should be able to:
- create Projects, Packages and Java Classes within Eclipse
- run Java Programs from within Eclipse
1. Getting Started
1.1 Directories
All of your work done in each lab and assignment throughout the course should be stored in your account on the undergrad machines.
- Create the directory ~/cs211. This will be the
root directory for everything done in this course. To do so, type
at the command prompt.
mkdir ~/cs211
- Create the subdirectory ~/cs211/tutorial in the same way, which will store all of you work for this tutorial.
1.2 Run Eclipse
This tutorial assumes you are working in CICSR 005, where all of your labs will be held. If you are working from home, you will need an up-to-date copy of both Java and Eclipse. This term we'll be using Java 6 and Eclipse 3.3. See our tutorial for setting up a machine for working at home.
1.3 Setting a Workspace
Eclipse uses a workspace to store your configuration settings and all of the files you are currently working on. It is possible to create more than one workspace but one should suffice for this courses. For this tutorial, feel free to use the default workspace.1.4 Configuring the code formatter.
There are many different ways to format code. One way to format the opening and closing braces for a method is as follows:
int getValue() {return value;
}
However, your textbook uses the following format:
int getValue(){
return value;
}
The Eclipse code formatter has a very long list of options. Fortunately, they can all be configured in one convenient step. Start by downloading the file CPSC211CodeFormat.xml to your cs211 directory. Back in the Preferences window in Eclipse:
- click the + sign alongside the word CodeStyle under the Java options in the left pane of the Preferences window
- select Formatter
- click the Import button
- navigate to the file CPSC211CodeFormat.xml that you stored in your cs211 directory
- click the Open button
- finally, click the OK button in the Preferences dialog box.
2. Perspectives & Views
- Eclipse's main window is divided into smaller windows called Views. Views display different information about your work. A Perspective in Eclipse is a configuration of Views.
- To open a specific Perspective, click Window -> Open Perspective ->, and select the desired Perspective.
- To open a specific View, click Window -> Show View ->, and select the desired View.
- To the far right of the top toolbar is the Perspectives tab. The
 button allows you to easily switch between any available Perspectives.
 - The current Perspective is also displayed on the title bar.
- In a Perspective, each View can be moved about as desired. Simply click
the View's title tab and drag to the new location. If the cursor turns into a
set of folders
 the View will be added
as another tab to the hovered over View. If the cursor turns into a solid
black arrow,
the View will be added
as another tab to the hovered over View. If the cursor turns into a solid
black arrow,  , the View will be inserted
as a new window beside the current View.
, the View will be inserted
as a new window beside the current View. - Window -> Reset Perspective is useful if you lose a useful View along the way.
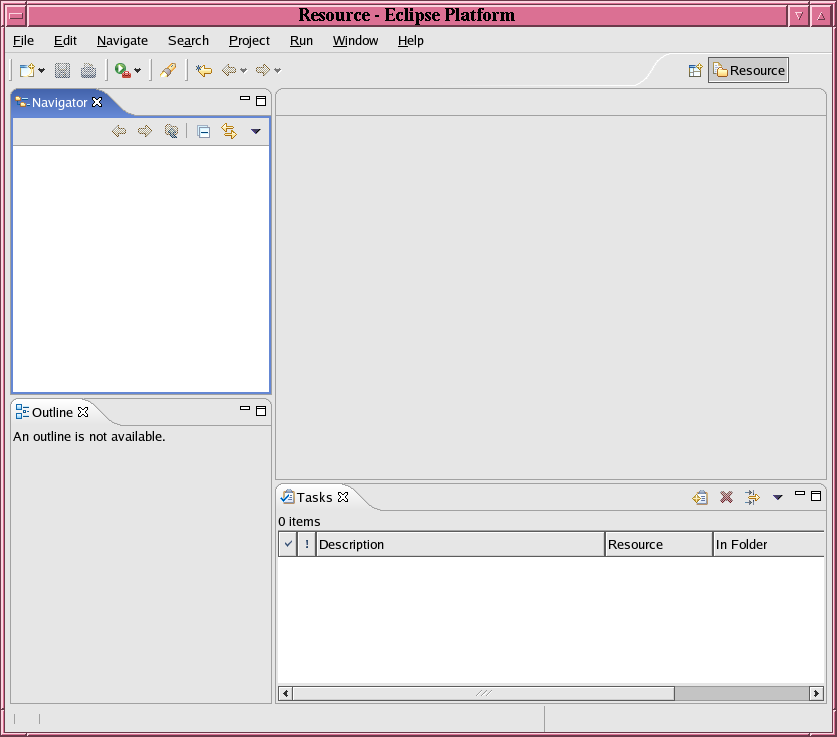
- Below, we see Eclipse open and displaying the Resource Perspective, which includes the Navigator, Outline and Tasks Views.
3. Hello World Example
Let's go through a simple example that will illustrate some major features of Eclipse, and demonstrate how Java projects are created and managed.
3.1 Creating a Project
- Eclipse allows you to organize your work into Projects. By default, Eclipse stores new Projects in a subdirectory under the workspace directory. You may also specify your own directory for the project, which is what you will do for each lab and assignment in this course.
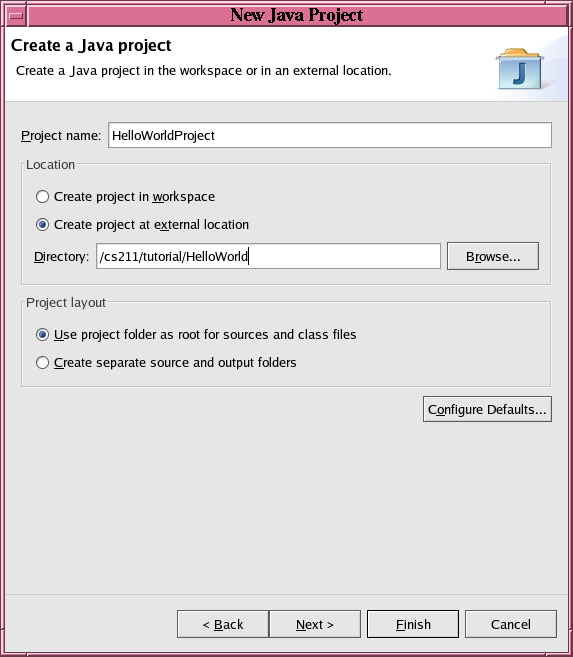
- Create the directory ~/cs211/tutorial/HelloWorld, which will be use to store the this tutorial's new Project.
- To create a new Java Project and specify its directory:
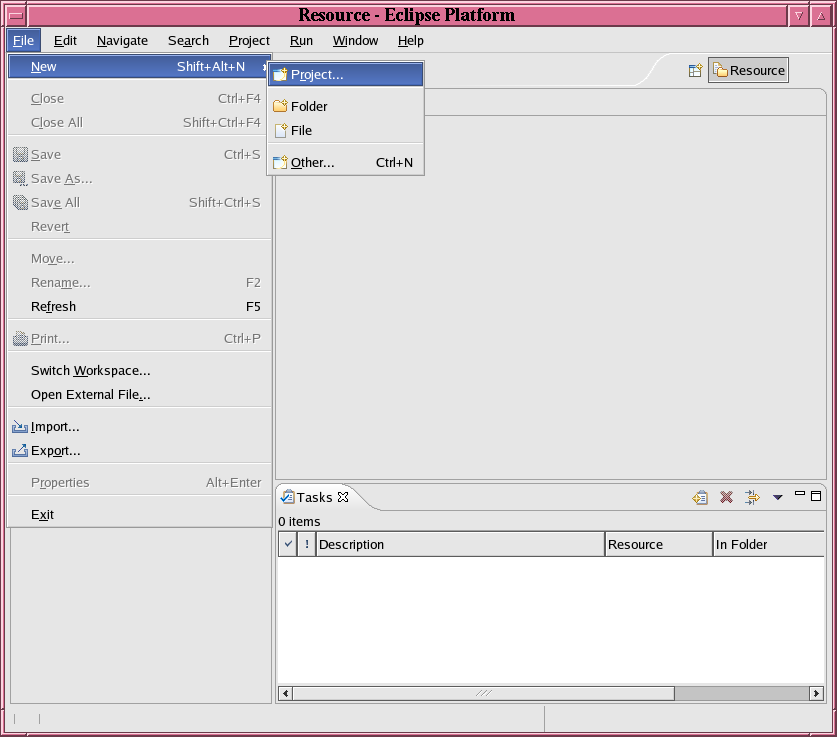
- Select File -> New -> Project. Alternatively, you
can right click in either the Package Explorer View or the Navigator View,
and also select New -> Project.
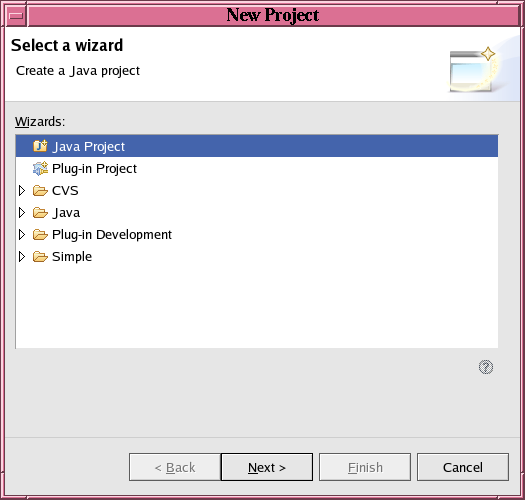
- This new window allows you select the kind of project to create. In
the Wizards list, select Java Project. Click Next >.
- In the New Java Project window, you can specify the
project's name and location.
- In the field Project name, enter HelloWorldProject
- For this project, you will need to use the HelloWorld directory that you created above. To do so, select Create project at external location, click Browse, and navigate to your previously created HelloWorld directory (~cs211/tutorial/HelloWorld).
- Click Finish to create the project. At this point you may be asked if you want to use the Java Perspective. Since we are creating a Java project, select 'Yes'.
- The Navigator View (Resource Perspective) and Package Explorer View (Java Perspective) will both contain a folder called HelloWorldProject.
- Navigator displays physical file information, which reflects what you will find in your file system. Class files, .project, and .classpath appear here.
- Package Explorer displays logical component information, which is dependent on the Project's configuration. Libraries linked to this Project, such as the Java Runtime Library (JRE), appear here.
- We will stick with the Java Perspective, and work mainly in the Package Explorer, for the rest of this tutorial.

- Select File -> New -> Project. Alternatively, you
can right click in either the Package Explorer View or the Navigator View,
and also select New -> Project.
3.2 Creating a Package
- A Package in Java is a group of classes which are often closely or logically related in some way.
- In CPSC 211 you may need to use packages to help organize your labs and assignments.
- Each new project has a default package. Components of the default package are stored directly in the project's main directory (e.g. ~cs211/tutorial/HelloWorld).
- To create a new package in the HelloWorld project:
- In the Package Explorer View, select the HelloWorld Project.
- Select File -> New -> Package, or right click on HelloWorld and select New -> Package.
- The Source Folder field indicates the project in which this package will be created. It should say HelloWorldProject; if not then type it in, or click Browse and select it from the resultant list.
- Specify the name of the package in the Name field. Enter helloWorldPackage.
- Click Finish to create the package.
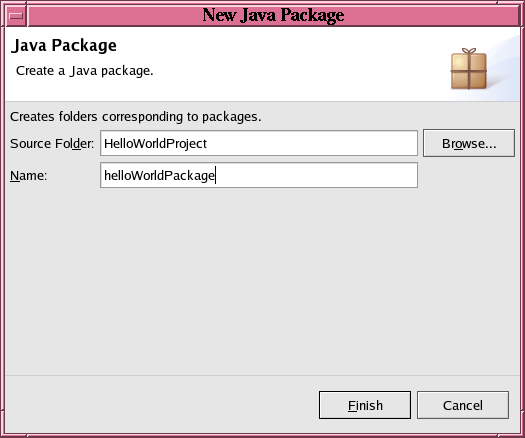
- A new package named helloWorldPackage is created, along with the subdirectory ~cs211/tutorial/HelloWorldProject/helloWorldPackage, which will contain all files belonging to the package. The Navigator and Package Explorer windows are updated to reflect the newly-minted package.
3.3 Creating a Class
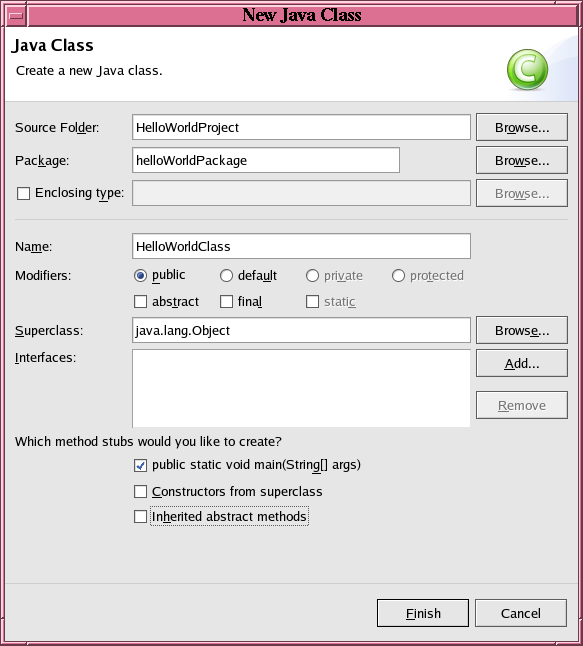
- Eclipse provides templates which greatly simplify class creation. These templates can generate skeletons for the basic code required by the new class.
- Class creation within Eclipse is similar to package creation. To create a new class:
- In the Package Explorer, select the HelloWorldPackage package, which is the package the class will be created in.
- Select File -> New -> Class, or right click on HelloWorldPackage and select New -> Class.
- If the Source Folder field does not already specify HelloWorldProject enter it to indicate the project this new class will belong to.
- If the Package field does not already specify HelloWorldPackage enter it to indicate the package this new class will belong to. If the class should be created in the default package, clear this field.
- In the Name field enter the class name HelloWorldClass.
- We want a simple public class with a main() method, so
select the following:
- Under Modifiers select public, which specifies this will be a public class.
- The Superclass field should read java.lang.Object. If we wanted to extend an existing class, we could specify it here, and have Eclipse generate stubs for all super class constructors and inherited abstract methods.
- The Interfaces field should be empty.
- Select only the public static void main(String[] args) checkbox.
- Click Finish to create the class. HelloWorldClass.java is created and HelloWorldClass.class is automatically compiled from it.
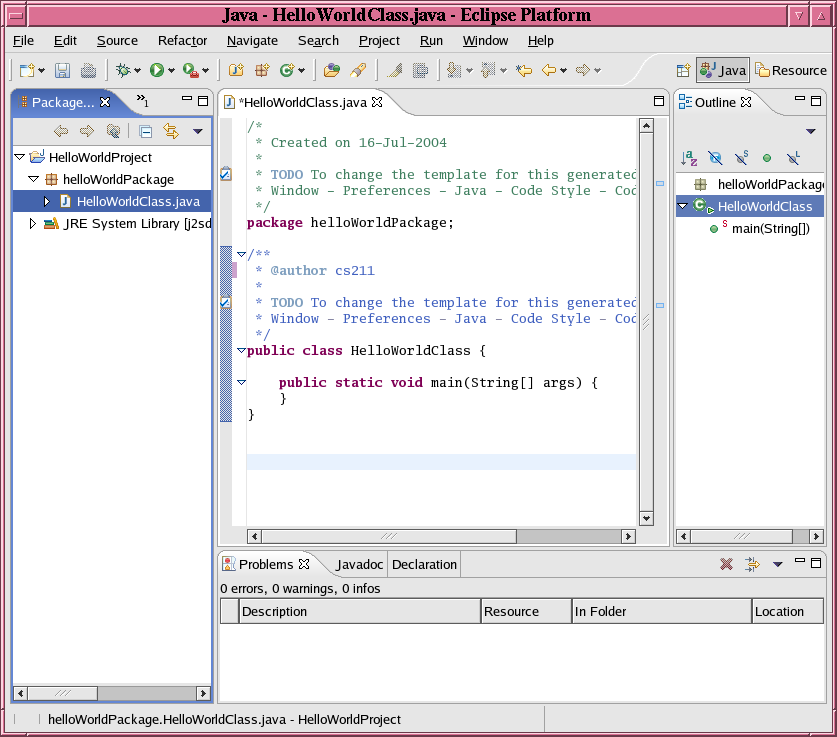
- The Text Editor View now displays a new tab with the "skeleton" of HelloWorldClass. You can double click on any tab in an Editor View to maximize it, and again to return it to normal size (this does not affect the perspective's configuration).
- The margin along the left of the Text Editor window is pretty busy here. The blue checkmarks correspond to 'TODO' comments, and help you track areas which need attention. The small triangles can be clicked to hide or expand sections of code. The thin pink bar represents code changed since the last save. Finally, the long blue bar represents the method with cursor focus.
3.4 Coding, Saving & Compiling
- You can edit the source code and compile from inside Eclipse.
- In the text editor change the following code:
public class HelloWorldClass
{
    public static void main(String[] args)
    {
    }
}
to
public class HelloWorldClass
{
    public static void main(String[] args)
    {
        System.out.println("Hello World");
    }
}
by adding the line: System.out.println("Hello World");
- Select File -> Save, or type Ctrl + s. This will save HelloWorldClass.java and recompile HelloWorldClass.class (and any files dependent on it).
3.5 Running the Program
- You can also run your program from within Eclipse.
- In the Package Exlporer, select HelloWorldClass.
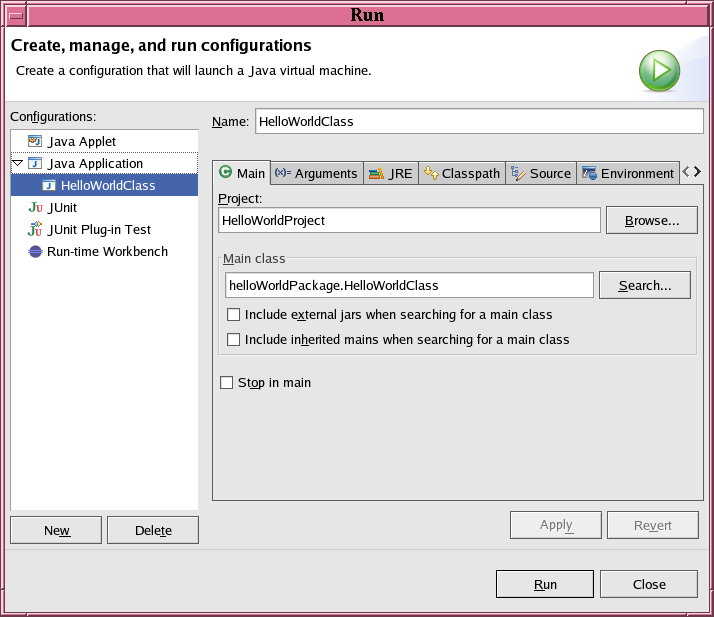
- Select Run -> Run..., or right-click on HelloWorldClass and select Run -> Run.... This will allow you to create a launch configuration, which tells Eclipse how to run your application.
- Choose the type of launch configuration to create. HelloWorld is a standard Java Application, so double click on Java Application.
- The Project field should contain HellowWorldProject, while the Main Class field should contain HelloWorldClass. If not, enter either one in.
- Click Run to execute this new launch configuration.
- The Console view handles the Standard I/O, so after running the program, Hello World, appears in the Console window.
- Add the line System.out.println(args[0]); after the line System.out.println("Hello World");. Our program will now
print out the first command line argument after Hello World.
Your code should look something like this:
public class HelloWorldClass { public static void main(String[] args) { System.out.println("Hello World!"); System.out.println(args[0]); } } - To run our program with command line arguments:
- Click Run -> Run... to bring up the launch configuration window.
- Under Java Application, select HelloWorldClass.
- Click the Arguments tab, in the Program Arguments field enter Goodbye and click Run. This is equivalent to typing java HelloWorldClass Goodbye in the command prompt.
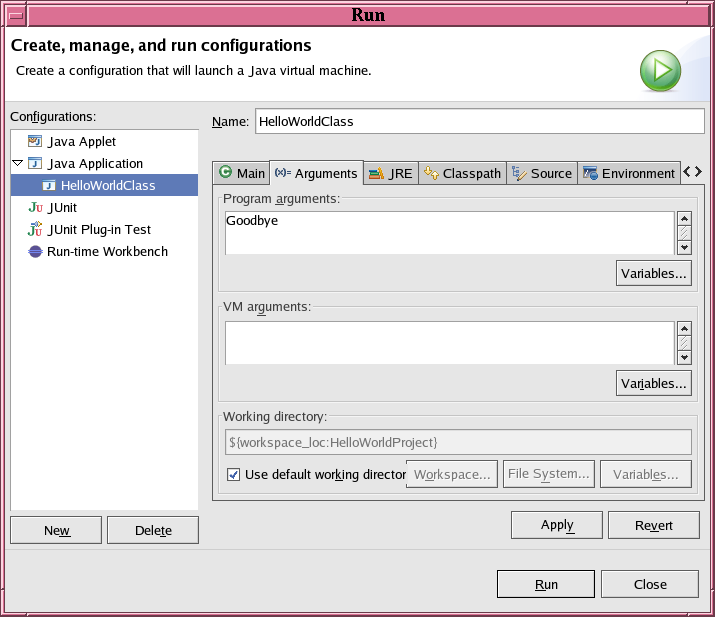
- The console should display:
Hello World
Goodbye- Tip: To run the file currently open in the text editor without any special settings (e.g. command line arguments), select Run -> Run As -> Java Application.
- Tip: To rerun the last application you ran, click the Run button,
 , on the top
horizontal toolbar (buttons to create new projects, packages, and classes
are also on the toolbar). Buttons on this toolbar differ among
perspectives.
, on the top
horizontal toolbar (buttons to create new projects, packages, and classes
are also on the toolbar). Buttons on this toolbar differ among
perspectives. - Tip: To run an existing launch configuration, click on the down arrow next to the Run button and selec the desired configuration.